Code / Linux Fundamentals / Chapter 4
Installing Arch Linux

nextsteplinux.com/lf4
You scanned the QR code from Chapter 4 of Linux Fundamentals. This page expands on the book content — it does not replace it. The full explanations, exam objectives, practice questions, and glossary are in the book.
Step 1 · Get Arch Linux
Download the Official ISO
Arch Linux is distributed as a single live ISO. Download from the official site
always verify the checksum before using the ISO for installation.
🐧
archlinux.org/download
Official Arch Linux ISO download page. Choose a mirror close to you for the fastest download. The ISO file is named archlinux-x86_64.iso.
archlinux.org/download
1
Verify the checksum
After downloading, verify the SHA256 checksum. A mismatch means the ISO is corrupted — re-download before proceeding.
# Download the official SHA256 checksum
curl -O https://archlinux.org/iso/latest/sha256sums.txt

# Verify your ISO matches the checksum
sha256sum --check sha256sums.txt --ignore-missing
ls /sys/firmware/efi
Visual Reference
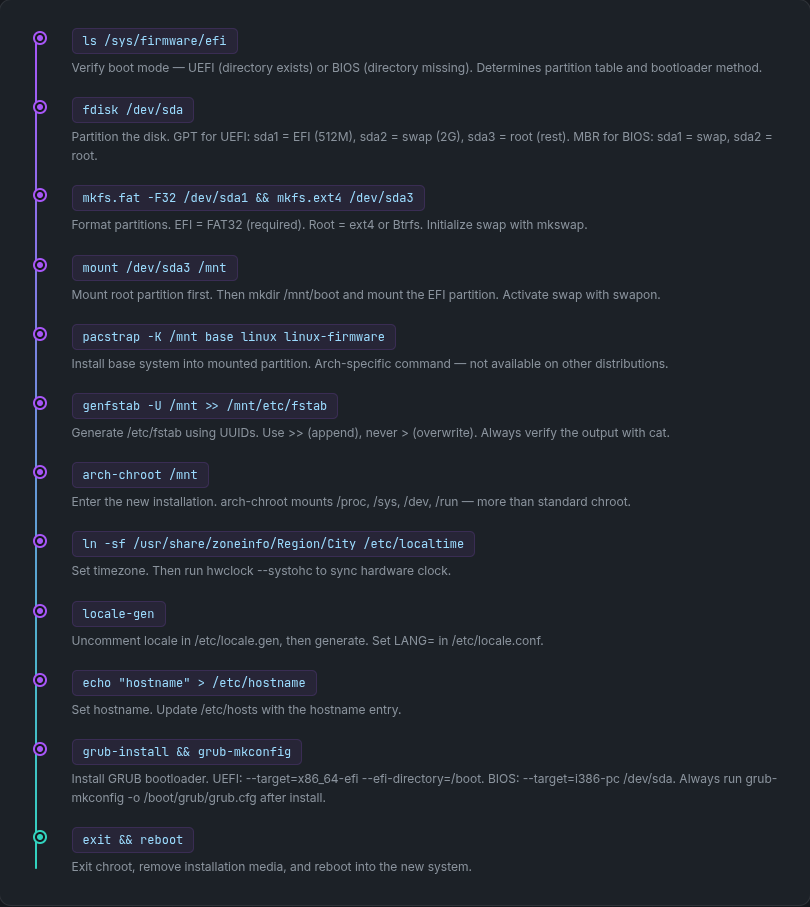
Manual Installation Sequence
The full installation sequence from the book, condensed as a quick reference. Each step maps to a section in Chapter 4. This is the order that matters — skip any step and the system won’t boot.
Visual Reference
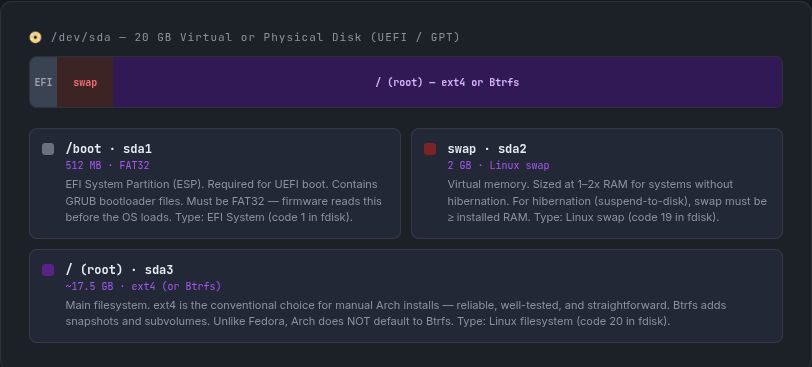
Arch Linux Partition Layout (UEFI)
This is the recommended manual partition layout for a UEFI Arch installation on a 20 GB disk. Unlike Ubuntu and Fedora, Arch does not create this automatically — you build it command by command.
After Installation · Scripts
Post-Install Scripts
These scripts automate the post-installation steps from Chapter 4. All use pacman — copy and paste into your Arch terminal after booting into the installed system.
01-update-system.sh
Syncs the pacman database and upgrades all installed packages to the latest versions. Always run this immediately after a fresh install.
#!/bin/bash
# 01-update-system.sh — Update Arch Linux after fresh install
# Website: nextsteplinux.com/lf4

echo "Starting Arch Linux system synchronization and update..."

# Sync package databases and upgrade all packages
# -S = sync, -y = refresh databases, -u = sys-upgrade
sudo pacman -Syu

echo "Update complete. System will now reboot to load any new kernel changes."

# Reboot to load a new kernel if one was installed
sudo reboot
02-install-essentials.sh
Installs the essential tools used throughout the rest of the book — development utilities, CLI tools, network utilities, and man pages. Run after updating the system.
#!/bin/bash
# 02-install-essentials.sh — Install tools used throughout the book
# Website: nextsteplinux.com/lf4

echo "Installing essential development and system tools..."

# 1. Base development tools and Git
# 'base-devel' is a package group; '--needed' prevents re-installing
sudo pacman -S --needed base-devel git

# 2. Common CLI utilities
sudo pacman -S --needed \
    vim \
    curl \
    wget \
    tree \
    htop \
    net-tools \
    bind \
    bash-completion \
    man-db \
    man-pages \
    openssh \
    ufw

# 3. Network Management
# Ensures the network starts automatically on every boot
sudo systemctl enable --now NetworkManager

echo "Essential tools installed successfully!"
03-verify-install.sh
Verifies your Arch installation is healthy. Checks OS info, kernel, pacman database, disk layout, swap status, and network connectivity.
#!/bin/bash
# 03-verify-install.sh — Verify Arch Linux installation
# Website: nextsteplinux.com/lf4

echo "=========================================="
echo "       ARCH VERIFICATION REPORT           "
echo "=========================================="

# 1. OS and Kernel Information
echo -e "\n--- OS Release ---"
cat /etc/os-release

echo -e "\n--- System Info ---"
uname -a

# 2. Storage and Mounts
# Vital in Arch to ensure your /etc/fstab was generated correctly
echo -e "\n--- Disk Layout ---"
lsblk

echo -e "\n--- File System Table (/etc/fstab) ---"
cat /etc/fstab

# 3. Memory and Swap Status
echo -e "\n--- Swap Status ---"
swapon --show
echo -e "\n--- Memory Usage ---"
free -h

# 4. Package Management and Services
echo -e "\n--- pacman Package Count ---"
pacman -Q | wc -l

echo -e "\n--- Enabled Services ---"
systemctl list-unit-files --type=service --state=enabled

# 5. Network Connectivity
echo -e "\n--- Network Connectivity ---"
if ping -c 2 archlinux.org &> /dev/null; then
    echo "Status: Network OK"
else
    echo "Status: Network FAILED"
fi

echo -e "\n=========================================="
echo "          Verification Complete           "
echo "=========================================="
Quick Reference
Package Management with pacman
The essential pacman commands for daily use. knowing how pacman compares to apt and dnf helps you answer questions about any of the three.
Action
Command
Description
Install
Sync: Downloads and installs the package.
Update
Sync + Refresh + Upgrade: The standard way to update a rolling release.
Remove
Remove: Deletes the package but keeps configuration files.
Recursive Remove
Recursive: Removes the package and its unused dependencies.
Purge
No-save: Removes the package, dependencies, and all config files.
Searching and Querying Packages
The essential pacman commands for daily use. Linux+ and LPIC-1 test general package management concepts — knowing how pacman compares to apt and dnf helps you answer questions about any of the three.
Action
Command
Description
Search Remote
Sync Search: Searches the remote repositories for a keyword.
Search Local
Query Search: Searches only the packages already installed on your system.
Remote Info
Sync Info: Displays detailed information (version, size, depends) from the repo.
Local Info
Query Info: Displays details for an installed package, including the install date.
Find Owner
Query Owner: Identifies which package “owns” or installed a specific file.
List All
Query All: Generates a complete list of every package installed on the system.
|
Action
|
APT (Debian/Ubuntu)
|
DNF (RHEL/Fedora)
|
pacman (Arch – Not on Test) |
|---|---|---|---|
|
Install Package |
apt install <pkg> |
dnf install |
pacman -S |
|
update Repositories |
apt update |
(Automatic) |
pacman -Sy |
|
Upgrade All |
apt upgrade |
dnf upgrade |
pacman -Syu |
|
Search |
apt search <term |
dnf search <term> |
pacman -Ss <term> |
|
Remove Package |
apt remove <term> |
dnf remove <term> |
pacman -R <term> |
|
Package Info |
apt show <pkg> |
dnf info <pkg |
pacman -Si <pkg> |
|
File Ownership |
dpkg -S /path |
dnf provides /path |
pacman -Qo /path |