Code / Linux Fundamentals / Chapter 1
Choosing Your Linux Journey
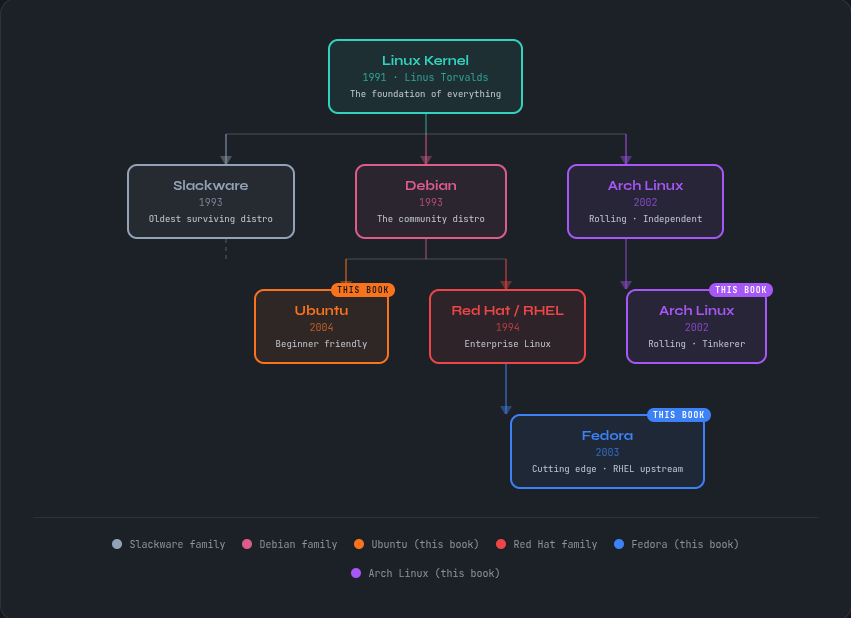
The Linux Family Tree
Linux isn’t one thing — it’s a family of operating systems all sharing the same kernel. Here’s how the three distributions in this book fit into the broader Linux world.
Download Your Distro
Ready to install? Grab the ISO for whichever distribution you chose in Chapter 1. Not sure yet? Start with Ubuntu.
Virtual Machine Setup Guide
Don’t want to touch your main machine? A Virtual Machine lets you run Linux inside a window on your existing Windows or Mac — no risk, no partitioning, no wiping anything. This is how many readers work through the entire book.
Download VirtualBox
Go to virtualbox.org/wiki/Downloads and download the installer for your operating system — Windows, macOS, or Linux. VirtualBox is completely free and open source.
Install VirtualBox
Run the installer and follow the prompts. On Windows you may see a warning about network interfaces — this is normal, click Yes to continue. On macOS you may need to allow the extension in System Preferences → Security & Privacy.
Download Your Linux ISO
Download the ISO file for whichever distro you chose above. Save it somewhere easy to find — your Desktop or Downloads folder works fine.
Tip: An ISO file is a complete disk image of the Linux installer. You don’t need to burn it to a USB drive for a
VM — VirtualBox reads it directly.
Create a New Virtual Machine
Open VirtualBox and click New. Give your VM a name (e.g. “Ubuntu 24.04”), select the ISO file you downloaded, and VirtualBox will detect the OS type automatically.
Recommended settings: At least 2048 MB RAM (4096 MB if your machine has 16GB+), 25 GB virtual hard disk, 2 CPU cores.
Start the VM and Install Linux
Open VirtualBox and click New. Give your VM a name (e.g. “Ubuntu 24.04”), select the ISO file you downloaded, and VirtualBox will detect the OS type automatically.
Note: Installing inside a VM is identical to installing on real hardware. Everything you learn transfers directly.
Install Guest Additions (Recommended)
After installing Linux, go to Devices → Insert Guest Additions CD Image in the VirtualBox menu. This enables shared clipboard, better screen resolution, and drag-and-drop between your host and VM.
sudo apt install virtualbox-guest-additions-iso # Ubuntu sudo dnf install virtualbox-guest-additions # Fedora
Download VMware Workstation Player
Go to vmware.com and download VMware Workstation Player. It’s free for personal use on Windows and Linux. macOS users should use VirtualBox or UTM instead.
Install VMware Player
Run the installer and follow the prompts. When asked about updates and user experience programs, you can safely decline both. Accept the license agreement and complete the installation.
Download Your Linux ISO
Download the ISO for Ubuntu, Fedora, or Arch Linux using the download links above.
Save it somewhere easy to find.
Create a New Virtual Machine
Open VMware Player and click Create a New Virtual Machine. Select Installer disc image file (ISO) and browse to your downloaded ISO. VMware will detect the OS automatically for Ubuntu and Fedora.
Easy Install: VMware’s Easy Install feature will automatically configure Ubuntu and Fedora during setup. Just enter a username and password when prompted.
Configure Hardware Settings
Before finishing, click Customize Hardware and set Memory to at least 2048 MB and Processors to 2. These settings can be changed later if needed.
Disk size: 25 GB is the minimum. Choose 40 GB if you have the space — it’s easier than expanding later
Configure Hardware Settings
Click Play Virtual Machine. Your VM will boot and the Linux installer will start. VMware Tools (the equivalent of VirtualBox Guest Additions) installs automatically for Ubuntu and Fedora.
Note for Arch: VMware’s Easy Install doesn’t support Arch Linux — follow the full manual installation in Chapter 4 of the book.