Understanding Linux Virtualization: KVM, Trust Boundaries, and Safe Development
Learn how KVM creates hardware-enforced isolation to protect your host system from experimental code, kernel panics, and dependency conflicts.
Metadata:
🟡 Level: Intermediate
⏱️ Reading Time: 10 minutes
🏷️ Topic: Linux Internals, Virtualization, KVM, VM Setup

1. Why Virtualization Matters for Development
High-risk development means working in unstable territory. Here’s what proper isolation gives you:
Crash Containment
If a driver or kernel module fails catastrophically, only the VM goes down — not your host machine with all your work, configurations, and personal files.
Dependency Peace
Some toolchains require specific library versions that conflict with rolling-release systems. VMs let you maintain multiple, incompatible environments side by side.
Filesystem Protection
A broken environment cannot corrupt your personal files or host filesystem. Your data stays safe even when experimenting with dangerous operations.
But this raises an important question: If a driver panics the guest kernel, why doesn’t it take down the host too?
2. How VMs Actually Protect You: The Trust Boundary
Modern Linux virtualization relies on KVM (Kernel-based Virtual Machine), which transforms the Linux kernel into a hypervisor. It leverages hardware virtualization extensions (Intel VT-x / AMD-V) to create a rigid security boundary.
The Architecture
How It Works
Privilege Separation
The CPU reserves Root Mode (Ring -1) for the host kernel. Guest kernels run entirely in Non-Root Mode, unable to access host memory or devices directly.
VM Exits
If a guest attempts an illegal operation (accessing host memory, privileged instructions), the hardware triggers a VM Exit, transferring control back to the host kernel. The host can then safely handle or terminate the VM.
Process Isolation
From the host’s perspective, a VM is just another process. A guest kernel panic is simply a crash inside a sandboxed memory space — it cannot escape to the host.
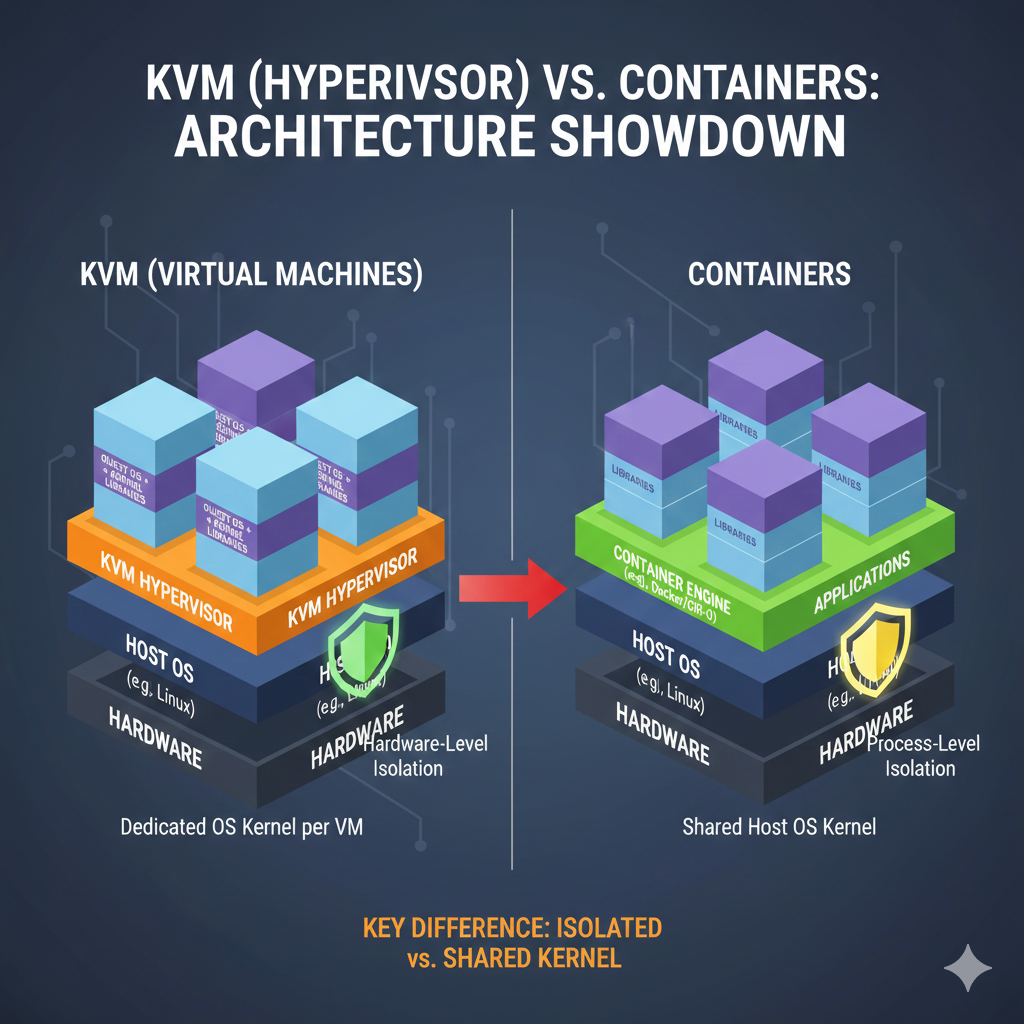
Contrast with Containers
[Image: Container vs VM comparison diagram]
Containers (Docker, LXC) share the host kernel. A kernel panic in a container can crash the host. VMs virtualize the entire kernel, creating true hardware-level isolation
💡 Quick Check: If a guest kernel panic occurs, what happens to the host?
Answer: Nothing. The panic is trapped in Non-Root Mode and handled as a normal process crash.⚠️ Important Exception: USB passthrough, PCI passthrough, and filesystem passthrough intentionally weaken this isolation boundary. We’ll cover these risks in Part 2’s security section.
3. Detective Work: Are You Already Virtualized?
Before building a lab, identify what you’re running on — a vital troubleshooting skill in real-world environments.
The Easy Way
Run hostnamectl and look for the Virtualization: line.
The Quick Check
systemd-detect-virt
Returns none on bare metal or the hypervisor name (e.g., kvm, vmware) if virtualized.
The Deep Log
dmesg | grep -i virtualization
Shows whether the kernel detected virtual hardware at boot.
💡 Why This Matters: Knowing your environment helps explain performance characteristics and troubleshoot boot issues. Some BIOS settings disable virtualization extensions even on physical hardware.
4. Prerequisites: Verifying Host Readiness
Before launching any VM, confirm your foundation is solid.
Hardware Virtualization Support
Without hardware acceleration, QEMU falls back to TCG (Tiny Code Generator) — software emulation that’s 10-100× slower and lacks hardware-level isolation.
# Check CPU virtualization support
lscpu | grep -E 'Virtualization|VT-x|AMD-V'
# Should show: Virtualization: VT-x (Intel) or AMD-V (AMD)

# Confirm KVM modules are loaded
lsmod | grep kvm
# Should show: kvm_intel or kvm_amd (depending on CPU vendor)
If checks fail:
- Enter BIOS/UEFI settings and enable “Intel VT-x” or “AMD-V”
- On some systems it’s called “SVM Mode” or “Virtualization Technology”
[Image: Terminal output showing successful virtualization check]
Image Integrity Verification
Download your .qcow2 image and verify the checksum to avoid subtle, hard-to-debug corruption:
sha256sum debian-13-genericcloud-amd64.qcow2
# Compare output against the official SHA256SUMS file from the download page
Mismatched checksums can cause mysterious boot failures, filesystem corruption, or security vulnerabilities from tampered images.
5. Building the Virtualization Stack
A professional setup consists of three layers:
- QEMU (The engine): Emulates hardware devices and manages VM processes
- KVM (The accelerator): Provides hardware-assisted virtualization
- Libvirt (The manager): Unified API for creating, configuring, and controlling VMs
- virt-manager (The interface): GUI tool for libvirt (covered in Part 2)
Installation by Distribution
| Distro Base | Installation Command |
|---|---|
| Arch Linux | sudo pacman -S qemu-desktop virt-manager libvirt virt-viewer dnsmasq vde2 bridge-utils openbsd-netcat iptables-nft guestfs-tools |
| Debian / Ubuntu | sudo apt update && sudo apt install qemu-system-x86 libvirt-daemon-system libvirt-clients virt-manager bridge-utils cloud-image-utils |
| Fedora | sudo dnf install @virtualization virt-manager guestfs-tools |
Understanding the Network Components
We install several networking tools that work together:
- dnsmasq: Provides DHCP and DNS to guest VMs
- bridge-utils: Creates virtual network switches
- iptables-nft: Handles NAT (Network Address Translation) for VM internet access
Two Common Network Modes:
- NAT (Default): VMs share host’s IP via translation. Safe, firewall-protected isolation.
- Bridged: VM appears as a physical peer on your network. Use with caution — exposes VM directly to your LAN.
Post-Install Setup (Arch Linux)
On Arch, services don’t start automatically:
# Enable and start libvirt daemon
sudo systemctl enable --now libvirtd

# Allow non-root VM management
sudo usermod -aG libvirt $(whoami)
# IMPORTANT: Log out and back in for group membership to take effect
Verify setup:
groups | grep libvirt  # Should show libvirt in your groups
virsh list --all       # Should connect without errors (empty list is fine)
6. Determining Firmware Type (UEFI vs. Legacy BIOS)
Before deploying a .qcow2 image, you must know if it requires UEFI (OVMF) or Legacy BIOS (SeaBIOS). While many modern cloud images are hybrid (supporting both modes), choosing the wrong firmware in your hypervisor can lead to a “No bootable device” error.
💡 Why This Matters: The firmware type affects not just booting, but also Secure Boot compatibility, disk partitioning schemes, and bootloader configuration. Understanding detection helps troubleshoot boot failures across VMs and physical systems.
Method 1: Filesystem Inspection (The “Ground Truth”)
Mounting the image allows you to inspect the GRUB modules and bootloader binaries. We use qemu-nbd to expose the image as a block device.
# 1. Expose the image as a block device
sudo modprobe nbd
sudo qemu-nbd --connect=/dev/nbd0 your-image.qcow2

# 2. Identify partitions
lsblk /dev/nbd0
# Look for the root or boot partition (typically p1 or p2)

# 3. Mount the primary partition
# Note: For Btrfs/LVM, ensure you mount the correct logical volume/subvolume
sudo mkdir -p /mnt/vm-inspect
sudo mount /dev/nbd0p1 /mnt/vm-inspect  # Adjust partition number as needed

# 4. Check for the Firmware Fingerprint
# We use 'test -d' for shell compatibility (Bash/Zsh)
if [ -d /mnt/vm-inspect/boot/grub/x86_64-efi ]; then
    echo "✓ UEFI Support: Found (x86_64-efi modules present)"
fi

if [ -d /mnt/vm-inspect/boot/grub/i386-pc ]; then
    echo "✓ Legacy BIOS Support: Found (i386-pc modules present)"
fi

# 5. Cleanup
sudo umount /mnt/vm-inspect
sudo qemu-nbd --disconnect /dev/nbd0
![[Image: UEFI vs BIOS detection output comparison]](https://nextsteplinux.com/wp-content/uploads/2026/02/sec06-1024x509.png)
Interpreting Results:
- Both directories present → Hybrid image (supports both modes)
- Only
x86_64-efi→ UEFI-only - Only
i386-pc→ Legacy BIOS-only - Neither found → Check
/boot/efi/EFI/for standalone EFI bootloaders (some distributions use different layouts)
⚠️ Note on Hybrid Images: If you see both directories, the image can boot either way. In this case, the Partition Table (Method 2) indicates the intended or optimized boot mode, though either will work.
Method 2: Partition Table & Flag Analysis
UEFI systems typically require a GPT (GUID Partition Table) and a specific ESP (EFI System Partition).
sudo modprobe nbd
sudo qemu-nbd --connect=/dev/nbd0 your-image.qcow2

# Check partition table type
sudo fdisk -l /dev/nbd0 | grep "Disklabel type"
# 'gpt' usually implies UEFI intent
# 'dos' (MBR) usually implies Legacy BIOS intent

# Check for the EFI System Partition (ESP)
sudo fdisk -l /dev/nbd0 | grep -i "EFI System"
# Look for partition type code 'EFI System' or hex code 'ef00'

# Alternative: Use parted for clearer ESP identification
sudo parted /dev/nbd0 print | grep -E "boot|esp"

sudo qemu-nbd --disconnect /dev/nbd0
Quick Reference:
- GPT + ESP partition → Optimized for UEFI (but may support Legacy via CSM)
- GPT without ESP → Likely hybrid or BIOS-only on GPT (less common)
- MBR/DOS table → Optimized for Legacy BIOS (but UEFI can boot MBR via CSM)
💡 Pro Tip: GPT doesn’t guarantee UEFI, and MBR doesn’t guarantee Legacy BIOS. Modern UEFI firmware includes CSM (Compatibility Support Module) to boot MBR disks, and some hybrid images use GPT with both ESP and BIOS boot partitions.
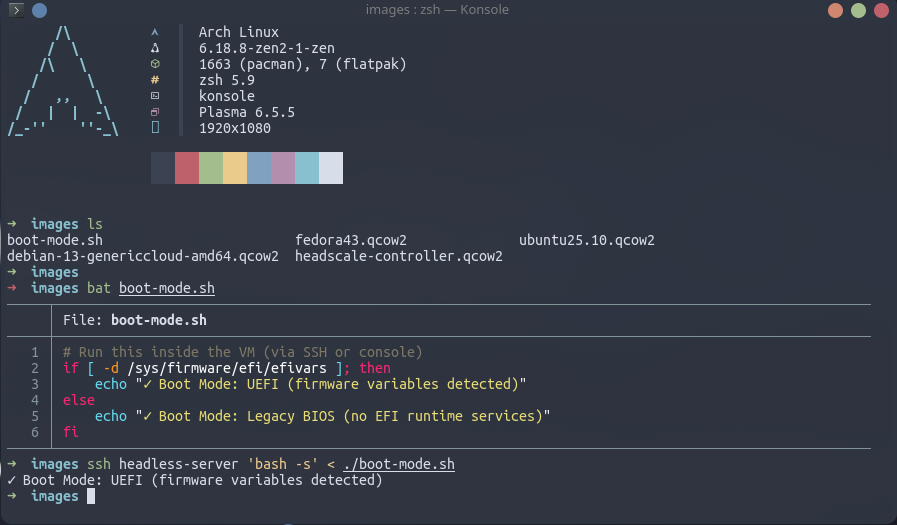
Method 3: Post-Boot Verification (Definitive)
If the VM is already running, don’t guess — check the kernel’s exported firmware variables. This is the most definitive check possible.
# Run this inside the VM (via SSH or console)
if [ -d /sys/firmware/efi/efivars ]; then
    echo "✓ Boot Mode: UEFI (firmware variables detected)"
else
    echo "✓ Boot Mode: Legacy BIOS (no EFI runtime services)"
fi
Why This Works:
/sys/firmware/efi/efivarsis a virtual filesystem created by the kernel at boot time- It only exists if the system actually booted via UEFI firmware
- This eliminates all ambiguity from pre-boot detection methods
Method 4: Quick Test Boot (Pragmatic Approach)
When detection is unclear or you want immediate confirmation:
# Try UEFI first (more common for modern images)
virt-install --name test-boot --boot uefi ...

# Watch the console:
# - Boots successfully → UEFI works
# - Hangs at "Booting from Hard Disk..." → Try Legacy BIOS

# If UEFI fails, recreate with Legacy BIOS:
virsh undefine test-boot
virt-install --name test-boot --boot bios ...
[Image: Method decision flowchart]
This takes 30-60 seconds and gives you a definitive answer without filesystem inspection.
Summary: Detection Logic Flowchart
To streamline your workflow, follow this decision tree:
| Check Method | UEFI Indicators | Legacy BIOS Indicators | Hybrid Indicators |
|---|---|---|---|
| Filename | *-uefi.qcow2, *-gen2.qcow2 | *-bios.qcow2 | *-genericcloud-*.qcow2 |
| Partition Table | GPT with ESP | MBR/DOS | GPT with both ESP and BIOS boot partition |
| GRUB Modules | /boot/grub/x86_64-efi | /boot/grub/i386-pc | Both directories present |
| Live System | /sys/firmware/efi exists | /sys/firmware/efi missing | N/A (shows actual boot mode) |
Recommended Workflow:
- Check filename/documentation (5 seconds)
- Run Method 2 partition check (15 seconds)
- If still uncertain, run Method 1 filesystem check (60 seconds)
- If deploying immediately, use Method 4 test boot (30 seconds)
- After successful boot, verify with Method 3 (5 seconds)
Understanding Hybrid Images
Modern cloud images (Debian, Ubuntu, Fedora cloud-init images) are often hybrid to maximize compatibility:
What “Hybrid” Means:
- Contains both UEFI and Legacy BIOS bootloaders
- Can boot in either mode depending on VM firmware setting
- GPT partition table with both ESP and “BIOS boot” partition (type code
ef02)
When to Use Each Mode:
- UEFI: Modern, supports Secure Boot, required for some features (TPM 2.0, etc.)
- Legacy BIOS: Maximum compatibility, simpler configuration, slightly faster boot on some systems
For hybrid images, either mode works — choose based on your needs, not the image’s “preference.”
7. First Launch: Understanding What Happens
When you create a VM, several things occur behind the scenes:
- Libvirt Registration: VM definition stored as XML in
/etc/libvirt/qemu/ - Resource Allocation: QEMU allocates virtual CPU/RAM from host resources
- Virtual Networking: Creates virtual NIC connected to
virbr0(libvirt’s NAT bridge) - KVM Sandboxing: Launches QEMU process, which KVM isolates in Non-Root Mode
The VM isn’t magic — it’s a carefully orchestrated Linux process with hardware-accelerated isolation.
Method 1: GUI (virt-manager)
virt-manager &
- Create a new VM → Choose “Import existing disk image”
- Select your .qcow2 → OS: “Debian 11” (or closest match)
- Resources: 2 vCPUs, 2048 MB RAM
- Before finishing: Click “Customize configuration before install”
- Firmware: Choose UEFI if your image has an EFI partition (see Section 6)
- Network: Default (NAT via
virbr0)
- Begin Installation → Watch console output
Method 2: CLI (for headless hosts or automation)
virt-install \
  --name debian-test \          # Libvirt identifier
  --memory 2048 \                # RAM allocation (host must have free memory)
  --vcpus 2 \                    # Virtual CPUs (can exceed physical cores safely)
  --disk path=/path/to/debian-13-genericcloud-amd64.qcow2,format=qcow2 \ # Copy-on-write disk
  --import \                     # Skip installer, boot existing image
  --os-variant debian11 \        # Optimizes virtual hardware for this OS
  --network network=default \    # Connects to virbr0 NAT (10.0.2.0/24 range)
  --graphics none \              # No VNC/Spice (headless mode)
  --console pty,target_type=serial # Connect via serial console
Success Indicators
- Console shows kernel boot messages
- System reaches login prompt
virsh list --allshows VM as “running”
Troubleshooting Boot Failures
VM won’t start at all:
# Check KVM module is loaded
lsmod | grep kvm_intel  # or kvm_amd

# Verify you have permission to access KVM
ls -l /dev/kvm
# Should show: crw-rw---- ... root kvm /dev/kvm
# If not, add yourself to kvm group: sudo usermod -aG kvm $(whoami)

# Review detailed logs
journalctl -u libvirtd -f
VM starts but won’t boot:
- UEFI/BIOS mismatch: Re-run Section 6 to verify boot mode, then match firmware setting
- Corrupted image: Verify checksum again (Section 4)
- Insufficient resources: Check
free -h— host needs free RAM for VM allocation
Network doesn’t work:
# Verify virbr0 bridge exists
ip link show virbr0

# Check if firewall is blocking
sudo iptables -L -n -v | grep virbr0

# Restart libvirt networking
sudo virsh net-destroy default
sudo virsh net-start default
8. Snapshots: Your Time Machine
QCOW2’s copy-on-write architecture enables instant snapshots:
How It Works:
- When you create a snapshot, the base image becomes read-only
- All new changes write to a separate delta file
- Reverting discards the delta and restores the base state
Take your first snapshot while the system is pristine:
virsh snapshot-create-as debian-test baseline-clean "Fresh install before customization"
To restore later:
virsh snapshot-revert debian-test baseline-clean
# Recovery takes seconds, not minutes
List all snapshots:
virsh snapshot-list debian-test
⚠️ Live Snapshot Caveat: Snapshots taken while the VM is running may capture inconsistent disk state (like photographing a moving car). For maximum reliability:
- Shut down the VM before snapshotting, OR
- Use
virsh snapshot-create-as --disk-onlyfor live snapshots, then manually backup databases/services
9. Resource Allocation Strategies
Partition resources so the host remains responsive while VMs stay useful.
| VM Profile | Recommended vCPUs | RAM | Disk Type | Use Case |
|---|---|---|---|---|
| Lightweight (Xubuntu) | 2 Cores | 2 GB | QCOW2 | Scripting, stable services |
| Heavyweight (Fedora / COSMIC) | 4+ Cores | 4–8 GB | QCOW2 | Compiling, GUI testing |
| Headless (Server) | 1 Core | 1 GB | QCOW2 | Network and web services |
Admin Tip — Thin Provisioning:
A 100 GB QCOW2 disk only consumes physical space as data is written. This allows safe over-provisioning (e.g., three 100 GB VMs on a 256 GB SSD).⚠️ Monitor host disk usage closely — if the host runs out of space, VMs may pause abruptly or suffer filesystem corruption. Use
qemu-img info image.qcow2to check actual disk usage.
CPU Over-provisioning:
VMs can have more vCPUs than physical cores (e.g., 2 VMs with 4 vCPUs each on a 4-core host). The hypervisor schedules them like processes. This works because most VMs aren’t CPU-bound 100% of the time.
10. Real-World Workflow: Multiple VMs, Clear Roles
In practice, deploy VMs with clearly defined purposes:
Xubuntu VM: Stable workhorse for routine scripting and predictable system changes. Conservative package versions, reliable daily driver.
Fedora (COSMIC) VM: Bleeding-edge environment for testing newer toolchains and desktop stacks. Catches compatibility issues before they reach production systems.
Headless Debian VM: Lightweight server for testing web services, network configurations, or containerized applications without GUI overhead.
Running these side by side transforms virtualization from a safety net into an efficient, intentional way to manage diverse development environments — each isolated, snapshotted, and recoverable in seconds.
What You’ve Learned
If you’ve followed along, you now understand:
✓ Why VMs protect better than containers (hardware-enforced CPU privilege separation)
✓ How KVM creates the trust boundary (Ring -1 vs Non-Root Mode, VM exits)
✓ What happens when you click “Create VM” (libvirt → QEMU → KVM sandboxing)
✓ When to use UEFI vs BIOS (image forensics with qemu-nbd)
✓ Where snapshots save you (QCOW2 copy-on-write deltas)
Next Steps
Part 2 will cover:
- virt-manager GUI deep-dive (storage pools, live migration, resource monitoring)
- Advanced networking (bridged mode, isolated networks, firewall rules)
- Security hardening (AppArmor profiles, passthrough risks, guest isolation best practices)
Hands-on Practice:
- Create a second VM and bridge them on an isolated network
- Intentionally break the guest OS (delete
/etc/fstab, fill the disk) - Practice snapshot recovery in under 30 seconds
The Real Test:
Can you explain to someone else why a kernel panic in a VM doesn’t crash your host? If yes, you’ve mastered the fundamentals.
